Gategram Mini App – User Guide
How to trade Gate.io USDT perpetual futures from Telegram
1. Opening the app
Open the Gategram bot in Telegram (t.me/gate_gram_bot), then tap Start or the menu button and choose Open Mini App (or the app link the bot sends). The app runs inside Telegram—no separate install.
2. Subscription and trial
New users get a 7‑day free trial. After that you need an active subscription to open new trades. You can still view and close existing positions if your subscription ends.
- Redeem a coupon: Settings → Coupon code → enter code → Redeem.
- Subscribe with Stars: Settings → Subscribe with Stars → pick a plan (1 / 3 / 12 months). Payment is via Telegram Stars.
Subscription days are added from your current expiry, so paying again extends your access.
3. Connecting your Gate.io account
Gategram trades on your behalf using Gate.io API keys. We never ask for withdrawal or password permissions—only trading.
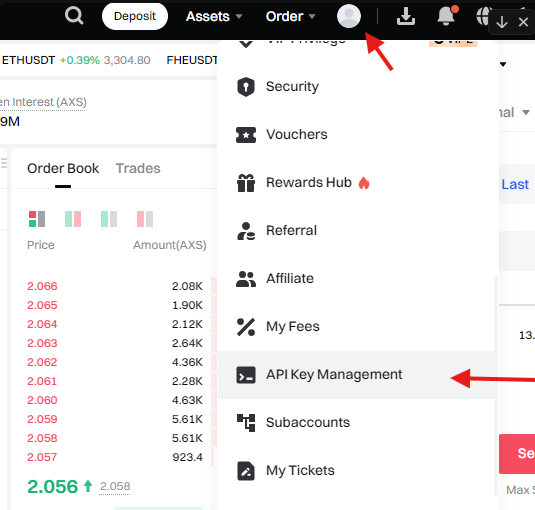
Step 1: Navigate to API Management
Log in to Gate.io (main or sub-account), click your profile icon (top right), then select API Key Management.
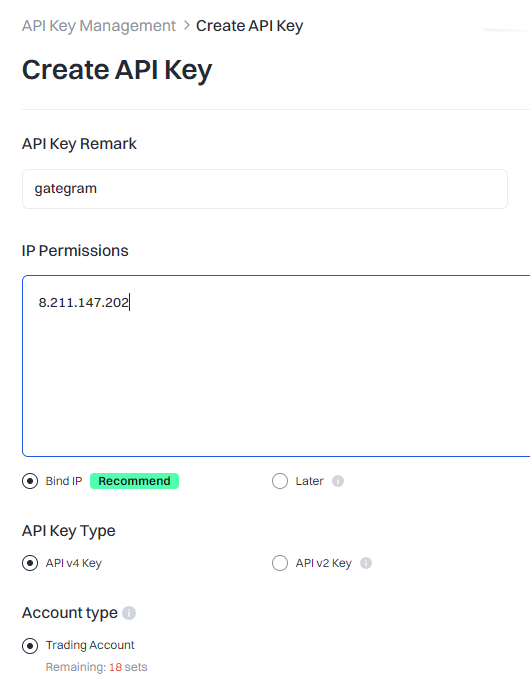
Step 2: Create your API key
Click Create API Key. Give it a name (for example, gategram) and configure:
- Choose API v4 Key (recommended).
- Select Trading Account.
- Add our server IP to the whitelist: (tap to copy).
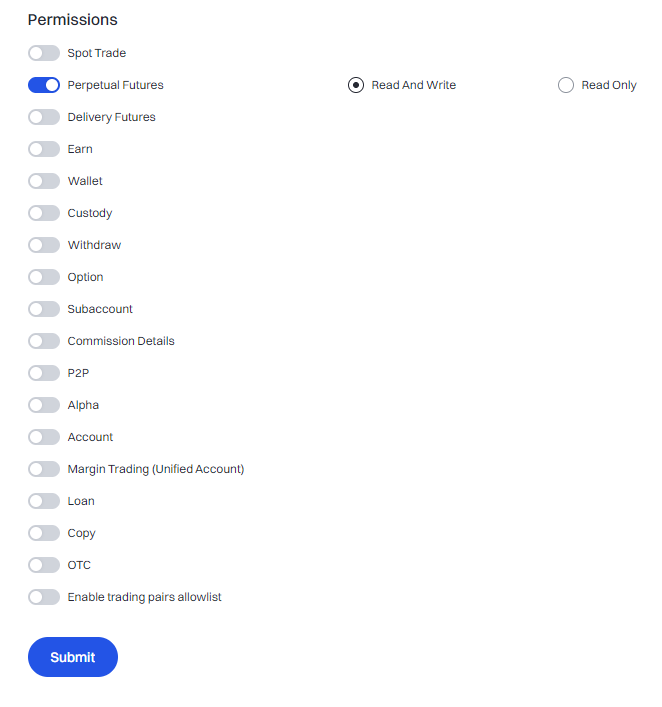
Step 3: Set permissions (critical)
✓ Enable: Perpetual Futures with Read and Write access.
✗ Disable: all other products and permissions (Spot, Wallet, Withdraw, Earn, Options, etc.) so the key can only manage your futures trades.
Final step: Copy and paste into Gategram
Important: Gate.io only shows your API Secret once when the key is created.
If you close or refresh the page without saving it, you will never see that Secret again. In that case you must create a new API key.
After Gate.io creates the key, copy both the API Key and Secret and paste them into the Gategram Settings → Gate.io API keys section, then tap Save.
4. Choosing a contract and leverage
At the top, tap the pair (e.g. BTCUSDT) to open the contract picker. Search or scroll, then select a contract. Leverage is set in the dropdown (e.g. 10x). You can change leverage before opening a position; it applies to that contract.
5. Placing trades
Market orders
Choose Market, set size (margin or position value and %), then Buy or Sell. The order fills at the current market price.
Limit orders
Choose Limit, enter your price (or use the adjust % buttons), set size, then place the order. It will fill when the market reaches your price.
Conditional orders (TP / SL)
You can add Take Profit and Stop Loss when placing a trade. Set the trigger price and optional limit price. These are sent to Gate.io as conditional orders and appear under the Conditional Orders tab.
You can also create standalone conditional orders in the Conditional tab (trigger rule, price type, expiry, market or limit).
6. Open positions and orders
Open Positions shows your active futures positions. You can sort by time, name, or PnL %. For each position you can:
- Market Close – close at market price (with % slider).
- Limit Close – set a limit exit price.
- Edit or add TP / SL for that position.
Open Orders lists your limit orders. Conditional Orders lists TP/SL and other conditional orders. You can cancel from there.
7. Charts and balance
The chart shows the selected contract. You can switch timeframes (1m, 5m, 15m, 1h, 4h, 1d). Limit, TP, and SL levels can appear on the chart. At the top you’ll see your Equity and Available balance from Gate.io futures.
8. Support and refunds
In Settings, tap Support to open the support chat and get help. Refund requests are handled through support; use the option in the support modal if needed.